
Applies to: Fundations 2.8.x (Free) and Fundations Pro
This guide covers installing Fundations, running the page installer, configuring payments and emails, and verifying that everything is working.
Requirements
Before installing, confirm your environment meets the system requirements. The key points:
- WordPress 5.0 or later (tested up to 6.9)
- PHP 7.4 or later
- A block theme (Full Site Editing). Classic themes are not supported.
- WP-Cron enabled, or a server cron job configured as a replacement
Installing Fundations (Free)
From the WordPress plugin directory
- Go to WordPress Admin → Plugins → Add New Plugin
- Search for Fundations
- Click Install Now on the Fundations plugin
- Click Activate
Manual upload
- Download the Fundations
.zipfile from getfundations.com - Go to WordPress Admin → Plugins → Add New Plugin → Upload Plugin
- Select the downloaded
.zipfile - Click Install Now, then Activate
On activation, Fundations creates three custom database tables and schedules three background cron events. See System Requirements for details on both.
Installing Fundations Pro
Fundations Pro is an add-on that requires the free Fundations plugin to be installed and active first.
- Purchase a Pro license at getfundations.com
- Download the Pro
.zipfrom your account - Go to WordPress Admin → Plugins → Add New Plugin → Upload Plugin
- Upload
fundations-pro.zip - Click Install Now, then Activate
- Go to Fundations → License and enter your license key
- Click Activate License
Pro features are gated behind a valid license. Without an active license, Pro activates but shows only an admin notice and the license page.
What Pro adds
| Feature | Free | Pro |
|---|---|---|
| PayPal payments | Yes | Yes |
| Mollie payments | No | Yes |
| Stripe payments | No | Yes |
| WooCommerce integration | No | Yes |
| Spam protection (reCAPTCHA v3, CleanTalk) | No | Yes |
| CRM integrations | No | Yes |
| Donation reports (charts, CSV) | Stub only | Full |
| Tip collection | Stub only | Full |
| Automation rules | No | Yes |
| Share modal block | No | Yes |
| Organisation Card block | No | Yes |
| Filter Bar block | No | Yes |
| Responsive Grid (core/group enhancement) | No | Yes |
Setting up the pages
Fundations requires seven pages on your site. These are not created automatically on activation. You must run the page installer manually.
Running the installer
- Go to Fundations → Settings
- Locate the Page Setup section
- Click Install Pages
The installer creates all seven pages and stores their IDs in the plugin settings.
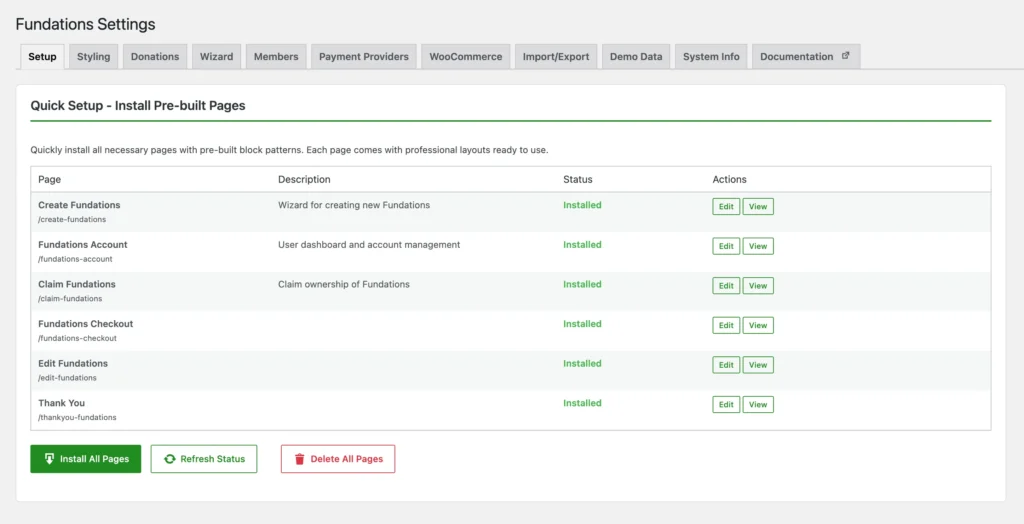
Pages created
| Page | Default slug | Purpose |
|---|---|---|
| Create Fundations | /create-fundations | Multi-step wizard for creating a fundraiser |
| Fundations | /fundations | Archive page listing all fundraisers |
| Fundations Account | /fundations-account | User dashboard |
| Claim Fundations | /claim-fundations | Claim ownership of a guest-created fundraiser |
| Edit Fundations | /edit-fundations | Frontend editing interface |
| Fundations Checkout | /fundations-checkout | WooCommerce checkout (page created for all installs; content only active with Pro + WooCommerce) |
| Thank You | /thankyou-fundations | Post-donation confirmation |
Each page is published immediately. If a page with the stored ID already exists and is not in the trash, the installer skips recreating it.
Re-creating a deleted page
If you accidentally delete or trash one of the auto-created pages, the installer can recreate it. Go to Fundations → Settings, find the Page Setup section, and run the installer again. Trashed pages are skipped, so the installer will create a fresh replacement.
Verifying page assignments
- Go to Fundations → Settings → Permalinks
- Confirm each dropdown points to the correct page:
- Wizard Page: Create Fundations
- Overview Page: Fundations
- Account Page: Fundations Account
- Claim Page: Claim Fundations
- Edit Page: Edit Fundations
- Checkout Page: Fundations Checkout
- Thank You Page: Thank You
Flush rewrite rules
After the pages are installed, flush WordPress rewrite rules:
- Go to Settings → Permalinks
- Click Save Changes (no changes needed, just save)
This step is required any time you change the CPT permalink structure, not just on initial setup.
Permalink structure
- Go to Fundations → Settings → Permalinks
- Choose a URL structure for fundraiser pages:
- Original:
/get_fund_action/fundraiser-name/ - Custom slug: Set a base such as
/fundraise/or/campaign/
- Save, then flush rewrite rules as above
Database migration
For fresh installs, the custom donations table is enabled automatically. No action is needed.
For existing installs upgrading from an older version that stored donations in post meta, the custom table is available but not yet used for reads. A migration step is required:
- Go to Fundations → Settings → Advanced (or the migration panel in your version)
- Run the donation migration
- Once complete, the plugin switches to reading from the custom table
Do not delete post meta donation data until you have verified the migration is complete and the counts match.
Payment provider setup
You need at least one payment provider configured before accepting donations.
| Provider | Plan | Setup location |
|---|---|---|
| PayPal | Free | Fundations → Settings → Donation Form |
| Mollie | Pro | Fundations → Settings → Donation Form |
| Stripe | Pro | Fundations → Settings → Donation Form |
| WooCommerce | Pro | Fundations → Settings → Donation Form |
For step-by-step provider setup, see the Payment Provider Setup guide.
Testing payments
All providers support a sandbox or test mode. Configure test credentials first, make a test donation, verify the donation appears in Fundations → Donations, then switch to live credentials.
Email configuration
Fundations sends transactional emails at key points in the donation and fundraiser lifecycle.
Email types
| Trigger | Recipient | |
|---|---|---|
| Welcome | New user registered via wizard | New user |
| Action Confirmation | Fundraiser created (registered user) | Creator |
| Guest Confirmation | Fundraiser created (guest) | Guest email |
| Donation Confirmation | Successful donation | Donor |
| Expiration (user) | Fundraiser end date reached, creator has claimed it | Creator |
| Expiration (admin) | Fundraiser end date reached, unclaimed | Site admin |
Configuring emails
- Go to Fundations → Settings → Emails
- For each email type, you can enable or disable it, edit the subject line, edit the body using placeholders, and send a test message
Placeholders
| Placeholder | Value |
|---|---|
{user_name} | Recipient display name |
{first_name} | Recipient first name |
{email} | Recipient email address |
{site_name} | Site name |
{action_title} | Fundraiser title |
{action_url} | Fundraiser page URL |
{action_goal} | Fundraising goal amount |
{campaign_name} | Parent campaign name |
{team_name} | Team name |
{raised_amount} | Total raised |
{end_date} | Campaign end date |
{edit_url} | Frontend edit URL |
Email branding
Go to Fundations → Settings → Emails to set:
- Header color (default:
#4a9d44) - Text color
- Button color
- Logo image
Spam protection
Spam protection is a Pro-only feature. Free installs do not have access to reCAPTCHA or CleanTalk integration.
With Fundations Pro active and a valid license:
- Go to Fundations → Settings → Spam Protection
- Select either reCAPTCHA v3 or CleanTalk
Google reCAPTCHA v3
- Create a site at google.com/recaptcha/admin (choose reCAPTCHA v3)
- Copy the Site Key and Secret Key
- Enter both in Fundations → Settings → Spam Protection
CleanTalk
- Create an account at cleantalk.org and get an API key
- Enter the API key in Fundations → Settings → Spam Protection
User roles
Fundations creates one custom role on activation:
| Role slug | Display name | Capabilities |
|---|---|---|
fund_member | Fundraiser | Read, create, edit, and delete own Fundations |
Users created through the fundraiser wizard automatically receive the Fundraiser role. Administrators have all Fundations capabilities by default. You can assign the Fundraiser role to existing users via Users → Edit User → Role.
Colors and styling
Go to Fundations → Settings → Colors to configure brand colors.
| Setting | Default | Affects |
|---|---|---|
| Primary Color | #4a9d44 | Buttons, links, CTAs |
| Secondary Color | #006f9e | Secondary buttons, accents |
| Progress Bar Start | #00770b | Left side of progress gradient |
| Progress Bar End | #6dc43a | Right side of progress gradient |
| Success Color | #4caf50 | Success messages |
| Warning Color | #ffc107 | Warning notices |
| Error Color | #d32f2f | Error messages |
Go to Fundations → Settings → Spacing & Typography for font sizes, spacing scale, border radii, and breakpoints.
Verifying the setup
Run through this checklist after completing setup:
- All 7 pages created and accessible
- Pages assigned correctly in Fundations → Settings → Permalinks
- At least one payment provider configured
- Test donation completed and visible in Fundations → Donations
- Campaign creation wizard works (test as a non-admin user)
- Frontend editing works
- Emails sending correctly (check spam folder too)
- Rewrite rules flushed
Troubleshooting
Pages were not created. Activation does not create pages automatically. Go to Fundations → Settings and run the page installer manually.
A page was deleted and donations or wizard redirects are broken. Run the page installer again. It will recreate any missing pages. Update the page assignments in Fundations → Settings → Permalinks if the new page IDs differ.
Rewrite rules are not flushing. Go to Settings → Permalinks and click Save Changes. If 404 errors persist, check that your server’s .htaccess file is writable, or add rewrite rules manually for Nginx environments.
Pro features not visible after entering a license key. Confirm the license key is entered exactly as shown in your account. The license is validated via Appsero on activation. If validation fails, check that your server can reach the Appsero API (outbound HTTP must not be blocked).
Test donations not appearing. Confirm you are using the correct test credentials for your payment provider and that the provider’s webhook URL is reachable. For local development environments, use a tunneling tool such as ngrok to expose the webhook endpoint.